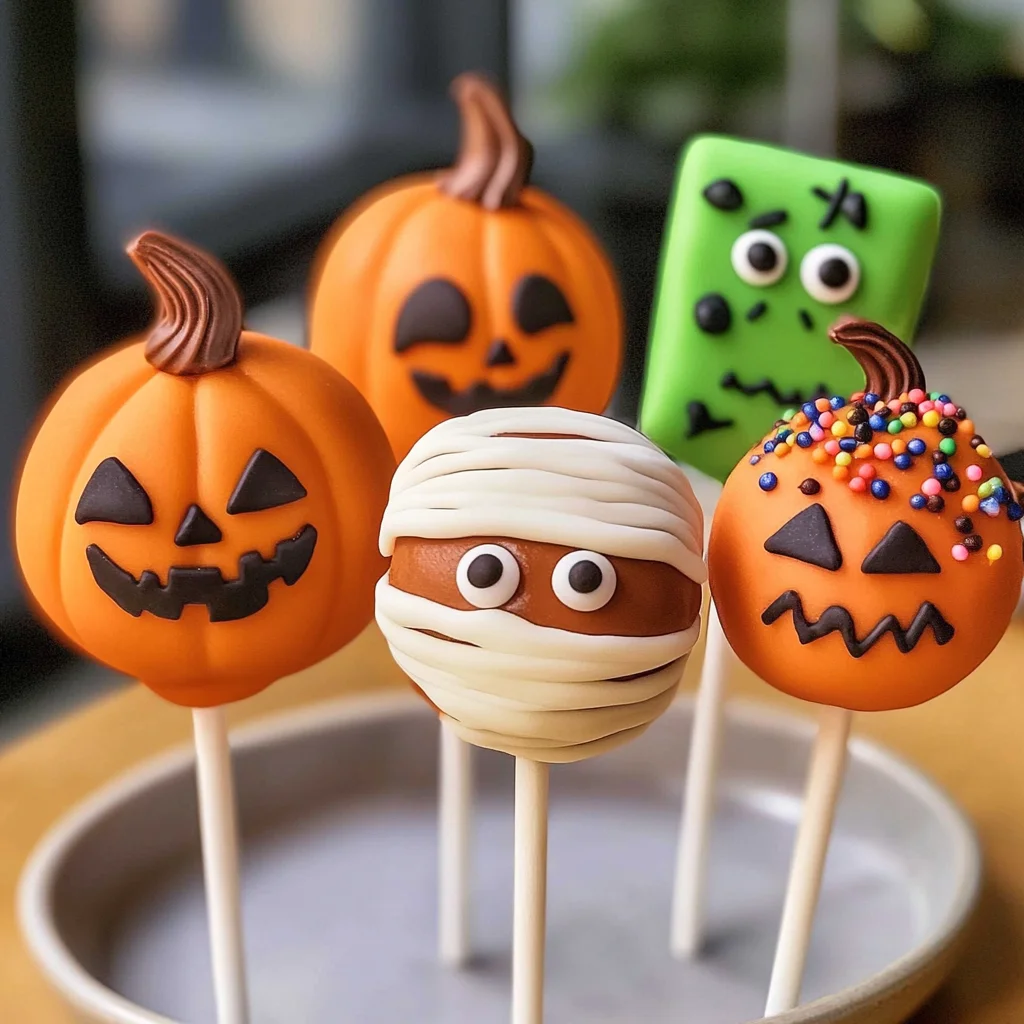
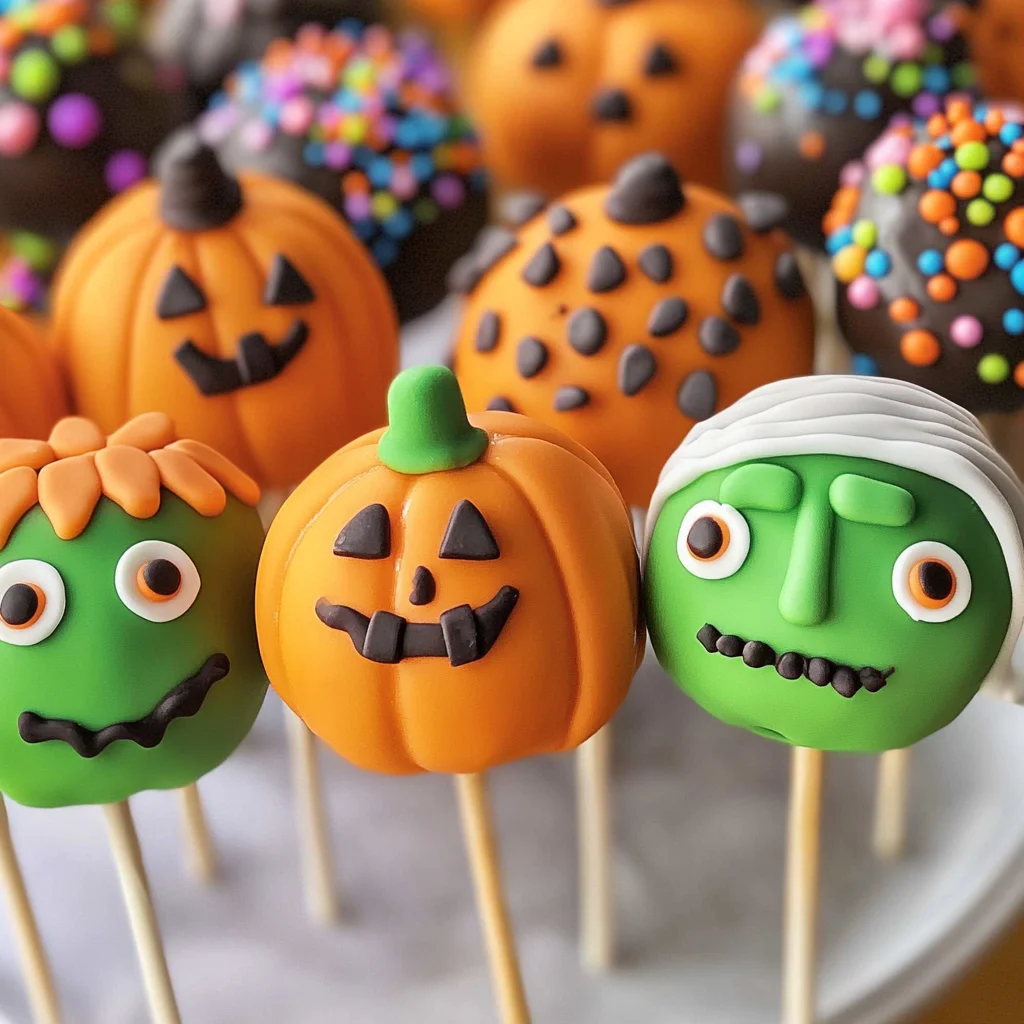
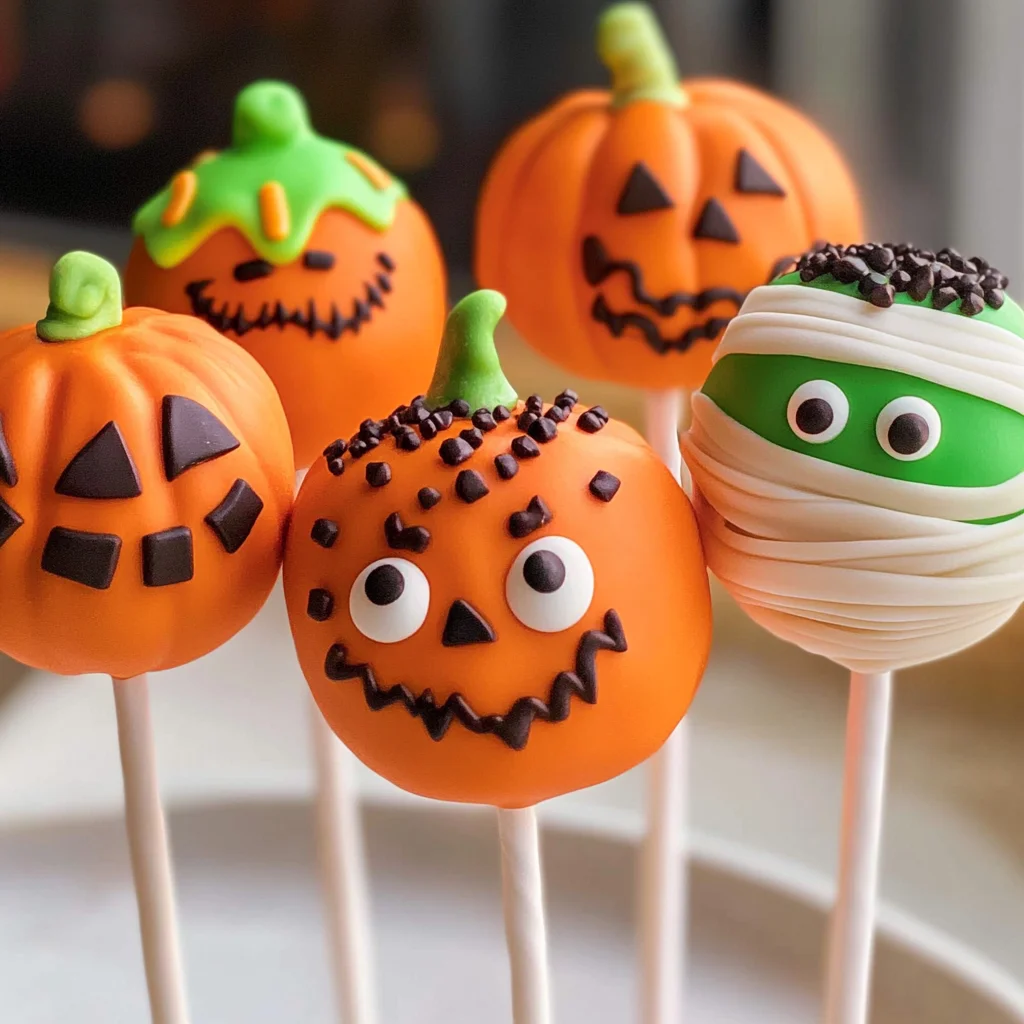
Add these spooky cake pops to your next Halloween party. Halloween Cake Pops are not only delicious but also fun to decorate! These bite-sized treats can be transformed into adorable Pumpkin, Frankenstein, and Mummy designs, making them perfect for various occasions like Halloween gatherings or festive celebrations.
Why You’ll Love This Recipe
Easy to Make: With simple steps and minimal ingredients, these cake pops can be prepared quickly, making them a great choice for last-minute treats.
Customizable Decorations: Let your creativity shine! You can use different toppings and colors to create unique designs that fit your Halloween theme.
Fun for All Ages: Kids will love helping with the decorating process, making this a fun family activity during the spooky season.
Deliciously Irresistible: The combination of moist cake and sweet candy coating ensures that every bite is bursting with flavor.
Tools and Preparation
Before you dive into making these delightful Halloween Cake Pops, gather a few essential tools. Having the right equipment makes the process smoother.
Essential Tools and Equipment
Mixing bowl
Baking pan (13 x 9)
Electric mixer or whisk
Refrigerator
Microwave-safe bowl
Cake pop sticks
Importance of Each Tool
Mixing bowl: A large mixing bowl is crucial for combining ingredients evenly and ensuring a smooth cake batter.
Baking pan (13 x 9): This size is perfect for baking the cake evenly, allowing it to cool properly before crumbling.
Electric mixer or whisk: Using an electric mixer saves time and effort in whipping up the cake batter to a fluffy consistency.
Ingredients
Add these spooky cake pops to your next Halloween party. Made with vanilla or chocolate cake, decorate these bite-sized pieces of cake for Halloween including a Pumpkin, Frankenstein, and a Mummy.
For the Cake
1 box Favorite cake mix
1 3.4 oz box instant pudding mix
4 eggs
1 cup water
1/3 cup vegetable oil
For the Decoration
1 cup Frosting
Candy Melts
Toppings – sprinkles, candy eyes
How to Make Halloween Cake Pops
Step 1: Preheat the Oven
Preheat your oven to 350°F. Spray your 13 x 9 pan with vegetable pan spray to ensure easy removal after baking.
Step 2: Prepare the Batter
In a large bowl, combine the cake mix, pudding mix, eggs, water, and oil. Beat at medium speed for about 2 minutes. Pour this mixture into your lightly greased baking pan.
Step 3: Bake the Cake
Bake for 30-40 minutes or until a toothpick inserted in the center comes out clean. Allow it to cool in the pan for about 10 minutes before transferring it to a wire rack.
Step 4: Crumble the Cake
Once cooled, crumble the cake in a large bowl using your hands or two forks until no large chunks remain.
Step 5: Add Frosting
Add frosting to the crumbled cake. Mix well with your fingers until everything is combined evenly.
Step 6: Form Cake Balls
Roll the mixture into small balls (about one inch in diameter) and set aside on a parchment-lined tray.
Step 7: Chill
Chill the formed cake balls in the refrigerator for at least 2 hours until they harden.
Step 8: Melt Candy Melts
Melt Candy Melts in intervals of 30 seconds in a microwave-safe bowl (at 50% power) or over low heat on the stove until smooth.
Step 9: Insert Sticks
Dip one end of each stick into melted Candy Melts and then insert it into each chilled cake ball; allow them to set. For faster setting, place them in the freezer for about 20 minutes.
Step 10: Dip Cake Pops
Wait until candy is completely firm before dipping each pop fully into melted Candy Melts.
Step 11: Decorate
Sprinkle on your chosen decorations like chopped up candy, nuts, or vibrant sprinkles while the coating is still wet. Enjoy your spooky creations!
With these straightforward steps, you’re ready to impress guests at any Halloween gathering with delightful Halloween Cake Pops!
How to Serve Halloween Cake Pops
Halloween cake pops are a fun and festive treat perfect for any spooky celebration. These bite-sized desserts can be served in various creative ways to impress your guests.
At a Halloween Party
Use decorative stands or cake pop holders to display your treats.
Arrange them in themed colors like orange, black, and purple for an eye-catching display.
As Party Favors
Wrap each cake pop in clear cellophane bags tied with colorful ribbons.
Attach a spooky tag with the guest’s name for a personalized touch.
As a Dessert Table Centerpiece
Create a dessert table featuring various Halloween treats alongside your cake pops.
Use themed platters and props like mini pumpkins or spider webs for added flair.
With Seasonal Drinks
Pair your cake pops with fun, non-alcoholic beverages like pumpkin spice lattes or apple cider.
Serve drinks in themed cups or mason jars to keep the spirit alive.
How to Perfect Halloween Cake Pops
Achieving the perfect Halloween cake pops requires some attention to detail. Here are some essential tips to ensure your treats are delicious and visually appealing.
Choose the right mix – Opt for a flavor combination that complements your decorations. Vanilla goes well with bright colors, while chocolate pairs nicely with darker themes.
Crumble evenly – Make sure the cake is crumbled into fine pieces before adding frosting. This ensures proper binding and texture.
Chill thoroughly – Allow the formed cake balls to chill adequately in the refrigerator. This step helps them hold their shape during dipping.
Melt candy melts carefully – Heat candy melts in short intervals to prevent burning. Stir between intervals for even melting.
Use quality decorations – Choose vibrant sprinkles and candy eyes that match your theme. Quality toppings enhance both look and taste.
Best Side Dishes for Halloween Cake Pops
Pairing side dishes with Halloween cake pops can elevate your dessert table. Here are some delightful options to consider:
Witch’s Brew Soup – A creamy green soup made from spinach and peas, served warm.
Mummy Hot Dogs – Classic hot dogs wrapped in crescent roll dough to resemble mummies, baked until golden brown.
Ghostly Guacamole – A smooth avocado dip shaped like a ghost, served with crunchy tortilla chips.
Cauldron Chili – Hearty chili made with ground turkey, beans, and spices; serve it in small cauldrons or bowls.
Spider Web Dip – Layered bean dip topped with sour cream drizzled in a spider web pattern; serve with tortilla chips.
Pumpkin Patch Salad – A fresh salad featuring mixed greens, roasted pumpkin cubes, and candied pecans dressed lightly with vinaigrette.
Common Mistakes to Avoid
Making Halloween Cake Pops can be a fun and creative experience, but there are some common pitfalls to watch out for.
Skipping the Cooling Step: Failing to cool the cake properly can result in soggy pops. Make sure to let the cake cool completely before crumbling it.
Using Too Much Frosting: Adding excessive frosting can make the mixture too wet. Start with a small amount and gradually add more until you achieve the right consistency.
Not Chilling the Cake Balls: Skipping the chilling step may cause the cake balls to fall apart when dipped. Ensure they are chilled for at least 2 hours to firm them up.
Overheating Candy Melts: Heating candy melts too quickly can cause them to seize. Use 30-second intervals in the microwave and stir between each interval for smooth melting.
Neglecting Decorations: Forgetting to decorate your pops immediately after dipping can lead to bland-looking treats. Add your toppings while the candy coating is still wet for best results.
Storage & Reheating Instructions
Refrigerator Storage
Store Halloween Cake Pops in an airtight container.
They can last up to 5 days in the refrigerator.
Freezing Halloween Cake Pops
Wrap each pop individually in plastic wrap before placing them in a freezer-safe bag.
They will keep well for up to 3 months in the freezer.
Reheating Halloween Cake Pops
Oven: Preheat your oven to 250°F and place pops on a baking sheet for about 10 minutes. This method helps maintain their shape.
Microwave: Heat on low power for about 10-15 seconds if you need them slightly warm, but avoid overheating.
Stovetop: Place on a pan over low heat, turning gently until warmed through.
Frequently Asked Questions
If you’re curious about making Halloween Cake Pops, here are some common questions that may help.
How do I make Halloween Cake Pops?
To make Halloween Cake Pops, bake your favorite cake, crumble it, mix with frosting, form into balls, chill, dip in melted candy melts, and decorate!
Can I use different cake flavors for Halloween Cake Pops?
Yes! You can use any cake flavor you like, such as vanilla, chocolate, or even red velvet. Get creative with flavors!
What are some decoration ideas for Halloween Cake Pops?
You can decorate with sprinkles, candy eyes, or themed toppings like mini chocolate chips or crushed cookies for added flair.
How long do Halloween Cake Pops last?
Halloween Cake Pops can last up to 5 days in the refrigerator and about 3 months if frozen properly.
Can I customize my Halloween Cake Pops?
Absolutely! Feel free to experiment with different colors of candy melts and various toppings to match your Halloween theme.
Final Thoughts
These Halloween Cake Pops are not only delicious but also incredibly versatile. You can easily customize them with different flavors and decorations to suit your style or party theme. Give this recipe a try at your next Halloween gathering!
Get ready to impress your guests this Halloween with these delightful Halloween Cake Pops! These adorable treats are perfect for festive gatherings, featuring a moist cake center coated in colorful candy melts and decorated to resemble pumpkins, Frankenstein, and mummies. Whether you’re hosting a spooky party or looking for a fun family activity, these cake pops are easy to make and customize. With their irresistible flavor and eye-catching designs, they’re sure to be a hit among kids and adults alike!
Ingredients
Scale
1 box favorite cake mix
1 3.4 oz box instant pudding mix
4 eggs
1 cup water
1/3 cup vegetable oil
1 cup frosting
Candy melts
Toppings (sprinkles, candy eyes)
Instructions
Preheat the oven to 350°F. Spray a 13 x 9 pan with vegetable spray.
In a large bowl, combine cake mix, pudding mix, eggs, water, and oil; beat for about 2 minutes.
Pour into the prepared pan and bake for 30-40 minutes until a toothpick comes out clean. Cool in the pan for 10 minutes before transferring to a wire rack.
Once cooled, crumble the cake into fine pieces in a large bowl. Mix in the frosting until well combined.
Roll the mixture into small balls and chill for at least 2 hours.
Melt candy melts as directed on the package; dip sticks into melted candy before inserting into each cake ball.
Dip each pop into melted candy melts and decorate while wet.
Prep Time:15 minutes
Cook Time:40 minutes
Category:Dessert
Method:Baking
Cuisine:American
Nutrition
Serving Size:1 serving
Calories:140
Sugar:12g
Sodium:80mg
Fat:7g
Saturated Fat:3g
Unsaturated Fat:3g
Trans Fat:0g
Carbohydrates:17g
Fiber:<1g
Protein:2g
Cholesterol:20mg
Keywords: Experiment with different flavors of cake or add food coloring to your candy melts for unique designs. Ensure proper chilling of cake balls to maintain their shape during dipping.